

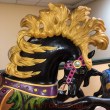
Our White Patriotic Jumper had repairs to be made on the tail,
the tail-to-leg connection, all four legs, and his belly.
When these repairs were completed, we could treat surface repairs and finish.
The White Patriotic Jumper is a sample treatment,
so you can see the process from start to finish!
We began our documentation with the tail.
MPFC’s goal, relative to the tail, was to restore the tail into working condition
as well as reestablish the tail’s joinery components (as Parker originally had intended, wherever possible) to allow for future repairs without the aid of
technical woodworking skills by future maintenance staff.
A guideline for these repairs will be created by MPFC for the edification and guidance of future JBC maintenance staff to ease the efforts of maintenance and
holistic preservation of the historic carousel horse’s various components.
Please excuse the grainy grey images in the woodworking rooms;
the yellowed lighting creates an odd discoloration.
Note that many explanations are under the images themselves!

The tail had three distinct repairs to be made before it could be reassembled:
tail to rump, a tail break midway in the tail,
and the tail-to-leg connection. We will cover these in three parts.
The repairs were performed separately over time.
We began with the Tail-To-Rump connection, and outline the tail
tenon and mortise repairs (Part I, below). The tail break itself is Part II.
Finally, the Tail-to-Knee connection, Part III. We documented them separately
until we came to fitting the tail back together again, during the painting posts!
The tail tenon is not a separate dowel inserted into the carved tail proper and into the mortise of the body of the horse, but a tenon which has been formed out of the tail stock. This is important because this allows us to move directly toward restoration
of the components rather than taking risky steps toward an attempt to remove doweling from the tail proper. One less risky procedure!
TAIL MORTISE AND TENON
EXCAVATION


First we removed the tail tenon from the rump mortise.
The removal of the tail presented difficulties during the extraction process
because of the “toe-nailing” of bisecting finish nails which penetrated the walls of the mortise, acting as sharp splines which grazed the walls and splintered
the rump’s tulip poplar wood substrate.
The screw through both mortise and tail tenon, shown in images 3-6 above,
was the easiest part of the excavation. The hidden nails, later repairs, caused many issues.
As the tail was gently pulled, images 7-10, above, hidden nails locked in! The tail tenon was gradually coaxed from the mortise using steady backward pressure.
When the tail released, three large nails were left — and all these previous reparations
were repaired so the tail is strong again, last two images, above.
TAIL TENON


Excavation involved removing the nails from the tenon.
Spiky nail-spines created tension but did little in actually holding the tail fast in its joinery. These nails later repairs, not original.


All the holes in the tail mortise were filled in order for the repairs to move forward.
The tenon must be as strong as possible before it is placed back into the mortise with as small as possible gap margin between the tenon surface and the mortise wall, so that adhesion between the two surfaces is not based solely upon the strength of the glues,
but also from adjoining component tension.
To this end, holes were drilled clean, and hardwood dowels were placed through the holes for snug fits. We used hide glue to secure the dowels.
Hide glue can be loosened with warm water, direct heat, or vinegar, if necessary, allowing for the reversibility of work performed possible by future restoration efforts.
These are left to cure overnight, and trimmed to historic levels.
The tenon was sized into the mortise (concurrently repaired, shown next).
The mortise, due to degradation and damaging repairs,
needed to be augmented by doweling, splines and veneers, then
rebored before inserting the repaired tail tenon back into the mortise.
TAIL MORTICE


The same nails that went through the tail tenon entered the tail mortise, leaving holes.
These were filled in a similar manner as the tenon. Nail holes were drilled clean of splintering debris, and hardwood dowels were inserted through the holes,
glued with hide glue, and left to cure before trimming.
Debris was thoroughly cleaned from the inside mortise walls.
This is shown in the first two images above.


The mortise was also repaired through the use of a larger dowel system.
Unfortunately, the mortise walls were crumbling.
The mortise was drilled cleanly, a bit larger than the crumbling walls, and fitted with hardwood dowels using hide glue amended with gap filling agents, above.


After curing, the restored tail tenon was measured and a fresh mortise was
drilled in the proper angle and size to accept the repaired tenon, above, while taking into account the orbit and trajectory of what was left of the original mortise path.
Because multiple sections of the mortise wall were asymmetrical and trumpet shaped, its depth and trajectory needed amending. This process was a several-part endeavor which encompassed at least eight individual steps which often overlapped the previous step.


The original screw hole was repaired: drilled clean, filled with a dowel,
and readied for the screw to be replaced again. Later in this process the fresh plug was redrilled to countersink a large stainless steel screw which bisected the tenon (as was originally designed) and anchored into the rump block below the tail tenon.


Above, the restored tail mortise, before and after!
Next, White Patriotic Jumper Treatment, Tail, Part II!
Follow us for updates on the happenings at the stable!
We will continue to take you behind the scenes! Currently we have:
Jantzen Beach Carousel Moving Day!
The Jantzen Beach Stable is Full!
Good Monday Morning!
and many others!
To keep abreast of our post, follow us here or
on Instagram (@mpfconservation) or on Facebook !


Written by Kate Powell ©MPF Conservation.
May be printed for your own use ONLY, not for use on blogs without permission.


T")


Pingback: JBC: White Patriotic Jumper Treatment, Oil Paint | Mpfconservation's Blog
Pingback: JBC: White Patriotic Jumper Treatment, Tail, Part III | MPF Conservation
Pingback: JBC: White Patriotic Jumper Treatment, Oil Paint 4 | MPF Conservation
Pingback: JBC: White Patriotic Jumper Treatment, Oil Paint 3 | MPF Conservation
Pingback: JBC: White Patriotic Jumper Treatment, Oil Paint 2 | MPF Conservation
Pingback: JBC: White Patriotic Jumper Treatment, Gesso | MPF Conservation
Pingback: JBC: White Patriotic Jumper Treatment, Finish Preparation | MPF Conservation