

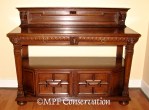
The chest of drawers is a seventeenth century French Louis XIV,
shown above after treatment in its full glory.
The drawers are wide and deep, and one can imagine a wealthy woman having a lovely chest to place long full slips and undergarments in with room to spare.


Before and after treatment, above.
To show all the various repairs that go into a piece like this would be monumental;
instead we offer a sampling of the many preservation/conservation
repairs performed on the Louis XIV chest.
This post covers samples of structural reparation.
Veneer was created ahead of time for the project,
as the original veneer was thicker than commercial veneers made today.
It was cut from old, vintage stock,
and finished using traditional pure shellac created in the studio with no fillers.


Top Left Drawer Corner
The top left-facing drawer corner is a good example of a complicated repair:
we show treatment up to the time it is ready for finish, below.
The top corner edge is broken and contains desiccated rubble, possibly some from
an old insect infestation. The punky structure probably made for an easy break.
Before and after treatment, as a teaser, above.


 Right, the right-facing top corner
for comparison. On the left-facing
top corner the damaged punky wood (rubble) was excavated from
the broken top drawer edge.
The splitting veneers were shaped
for repair with various chisels.
The voids are measured. Three
different pieces are crafted to be used
in the repair: An angled piece of
drawer; A backing that runs the length of the drawer face; The lip itself.
When these are completed, the pieces are glued using hide glue, and clamped to cure.


The second day, the clamps off, and the various parts are shaped, using carving chisels
and small planes, then sanded with a sanding tool shaped for this application.
Veneer is trimmed for replacement with new veneer.
The pieces are glued using hide glue, and clamped to cure.
The drawer is ready for finish work, which involves matching the color of the shellac.


Escutcheon Mortises
Several screw mounting mortise were enlarged and this left
the pulls to move about, scratching the drawer faces.
The repair involves carefully routing the mortise from both sides
(so as not to damage the veneer), insert matching stair-stepping wooden plugs,
gluing in place, and then carefully redrilling the mortise.
The mortise now hold the escutcheons securely.
We move to Pest Infestation!


Written by Kate Powell, ©MPF Conservation.
May be printed for your own use ONLY, not for use on blogs without permission.


T")


Such patience and craftsmanship on display here. Very nicely done! I understand what you’re doing (especially forming your own sanding block) but I’m not sure I have the eye or the patience or the “touch” to do it. I love the pictures!
You would have the patience and the touch — you just have to find a piece and practice.
I have repaired furniture, and I think I could repeat these steps. What impresses me, even more, is the knowledge of how things were made and the ability to “deconstruct” carefully.
Actually, excavation of items, removing parts carefully, is one thing that helps so much in bring them back to life properly. Clients sometimes don’t understand why it might take a day to undress and open joints on a piece, but that is because you have to pay attention. I wish you and M could chat — you guys would be friends. When you come to Portland!
I hope to get back there at some point.
Yay!