


Our White Patriotic Jumper had treatment of:
Treatment, Tail, Part I; Treatment, Tail, Part II, Treatment, Tail, Part III,
Treatment, Knees and Thighs, Treatment, Belly Split.
When these repairs were completed, we could prep surface repairs and finish.

The White Patriotic Jumper is a sample treatment,
so our client can see the process from start to finish!
This post is about the preparation
of the existing finish in order
to paint the Patriotic Jumper!
In order to repaint the horse, which has suffered many repairs,
the existing acrylic paint must be removed.
Further, the existing paint has issues described below.
This is not a complete stripping, but removing varnish and
top acrylic paints by hand, in order to find the stable acrylic base coats,
meaning paint that is not soft and not contaminated
by the varnish topcoats and deep grime left on the horses.
Regarding this process, in hindsight,
we discovered many issues we had with the existing acrylic paint.


We noted the acrylic was soft in our early testing, above.
Grease and grime from the kids handling and
lack of good maintenance before storing was also an issue.
Note: Remember all items should be cleaned of oily grime before storing.
However, as we investigated the various paint colors on various parts that were unlikely to have been covered with grime, we have to now come to a different conclusion.
The existing acrylic paints were also the problem.
The roof of Patriotic’s mouth, which is not a place children would touch
(less grime factors) and which was not coated with inappropriate varnishes,
comes off in a soft slippery thin coat, and is difficult to sand.

Like all of our repairs up until the actual painting of Patriotic Jumper,
the reparation and abrasions did not happen sequentially.
When Mitchell finished the belly repairs; he began his removal of the damaged
existing acrylic paint while Patriotic Jumper was upside down.
Not many images of the removal and abrasion process were taken.
Some of the initial stages we were in masks due to chemicals used in the process.
Note: We use very small amounts of dangerous chemicals in our business.
Naphtha was used to remove the stubborn varnish and grease from the existing acrylic paint. Abrasion was used to remove the softest top layers of existing acrylics.


Removal of top coats began with scraping and sanding.
Oddly, the existing acrylic paint smelled damp when sanded, which is very odd.
Wherever this horse has been in past, he’s been in our climate
controlled studio for many months and so we have no explanation for this.
In the second image above, you can see that some of the paint literally popped off,
and this may be because of proximity to the belly and damp wood beneath.
As we were sanding, we wanted to see all potentially compromised joins
in order to seal as we prepped, as shown on the neck, below.
We want to seal all open stable cracks in order for the paint to be smooth,
and also to prevent moisture wicking into cracks.


In one case we found a
reason to insert a keylock, right. The romance rump
was starting to split at a
board join, and what appeared
as hairline crack of no importance under the pain showed that a larger crack was developing, and we needed
to stop that split in two
boards before it grew and undermined a completed horse’s finish several years down the road. Painting was delayed while a keylock was carved into the rump.


last restoration were surprisingly gummy
stick-on stars, and
they were coming off, right.
We removed all the
stick-on stars, and will
replace with painted stars.
The stick-on stars were
placed over areas where
there were indentations in the wood. It doesn’t make sense that the stick-ons did this, so we are uncertain as to the history of the indentations.
The bumpy star indentations also were removed, above.


Various methods of paint removal were utilized to get into the crevices,
and the sanding itself is difficult work. Hand-sanding is necessary as motorized sanding
is not gentle and it is extremely easy to over sand and dig down into the wood.
Hand carving and scraping tools were utilized.
In most cases, only soft acrylic paint was removed,
except in areas were woodworking treatment was performed.


Patriotic Jumper is a century old, and in some areas carving walls have
diminished or fragmented, or walls around gems have splintered.
Mitchell cleaned up fragmented walls where possible, Above, he carved a bit around the flower on the shield, where the carving edges were tattered and nearly invisible.


An example of our paint removal, before and after, above.


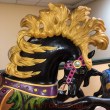
The manes can be wildly flowing and difficult: using a carving tool
is one of the easiest ways to remove the paint in the grooves.
It just takes a light touch not to dig down too far!


Ears, eyes, nose, teeth…


Finally, we polished the gems.
Some of the gems were terribly scratched by some sort of abrasive.


He is fully prepped (tail to be added later)!
Gesso, the first step in finish work can begin!
Follow us for updates on the happenings at the stable!
We will continue to take you behind the scenes!
Search “JBC” or “Jantzen Beach” in our search feature (right) for more posts.
To keep abreast of our post, follow us here or
on Instagram (@mpfconservation) or on Facebook !


Written by Kate Powell ©MPF Conservation.
May be printed for your own use ONLY, not for use on blogs without permission.


T")


