

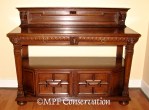
The chest of drawers is a seventeenth century French Louis XIV,
shown above after treatment in its full glory.
The drawers are wide and deep, and one can imagine a wealthy woman having a lovely chest to place long full slips and undergarments in with room to spare.


Before and after treatment, above.
To show all the various repairs that go into a piece like this would be monumental;
instead we offer a sampling of the many preservation/conservation
repairs performed on the Louis XIV chest.
All products used are museum approved especially if they are non-reversible,
such as the infilling of deep pest bores for strength and preservation.
This post covers samples of structural reparation.
Veneer was created ahead of time for the project,
as the original veneer was thicker than commercial veneers made today.
It was cut from old, vintage stock,
and finished using traditional pure shellac created in the studio with no fillers.


Top Left Drawer Corner
The top left-facing drawer corner is a good example of a complicated repair:
we show treatment up to the time it is ready for finish, below.
The top corner edge is broken and contains desiccated rubble, possibly some from
an old insect infestation. The punky structure probably made for an easy break.
Before and after treatment, as a teaser, above.


 Right, the right-facing top corner
for comparison. On the left-facing
top corner the damaged punky wood (rubble) was excavated from
the broken top drawer edge.
The splitting veneers were shaped
for repair with various chisels.
The voids are measured. Three
different pieces are crafted to be used
in the repair: An angled piece of
drawer; A backing that runs the length of the drawer face; The lip itself.
When these are completed, the pieces are glued using hide glue, and clamped to cure.


The second day, the clamps off, and the various parts are shaped, using carving chisels
and small planes, then sanded with a sanding tool shaped for this application.
Veneer is trimmed for replacement with new veneer.
The pieces are glued using hide glue, and clamped to cure.
The drawer is ready for finish work, which involves matching the color of the shellac.


Escutcheon Mortises
Several screw mounting mortise were enlarged and this left
the pulls to move about, scratching the drawer faces.
The repair involves carefully routing the mortise from both sides
(so as not to damage the veneer), insert matching stair-stepping wooden plugs,
gluing in place, and then carefully redrilling the mortise.
The mortise now hold the escutcheons securely.
This post covers samples of
treatment for pest infestation.
 The structure was undermined severely in the drawers from
a very old pest infestation.
Some of the damage occurred from poor woodworking repairs; we needed to fill the punky wood and pest holes. A mixture of Rhoplex® with and without strengtheners was mixed and injected into the punky wood and vacant bore holes.


The bottoms of all the drawers needed
treatment, as well as the sides, below.


Carcass Damage


The interior of the carcass was treated, with both traditional woodworking repairs,
such as new slides or reparation of near breaks of the drawer supports,
as well as Rhoplex® as needed for pest infestation consolidation.
Before and after treatment, above.


The outside back was also similarly repaired, and all pest holes filled.
Before and after treatment, above.

We move now to Veneers and Finish!
Veneer for amendments was created by MPFC ahead of time for the project,
as it was thicker than veneer made today. It was cut from old stock,
and finished using traditional pure shellac created in the studio with no fillers.


As a teaser, before and after treatment, above.
The chest was covered with beautiful marquetry, but the thick veneer
was lifting, cracked, and sometimes missing altogether.
Our clients wanted the veneer resecured, and larger pieces of missing veneer replaced. Smaller areas might be treated using shellac burnins and/or hard wax fills.


Some smaller areas could be easily reglued using a hypodermic needle
and warmed Old Brown Glue (pure hide glue.) However, larger areas where
veneers had slightly warped needed a more secure gluing system, below.


Many large original veneer areas were loose and required an innovative support
to cure flat as there was no way to clamp on the backside.
A backing was built for the chest, shown above and below, right.
In a long day, Mitchell wanted to glue down all the major loose veneer areas.
 Veneer was gently lifted (not pried,
as it was loose),and loose debris was removed. Hide glue was warmed and inserted via syringe and a thin needle — slipped under the veneer. Veneer was pressed to expel excess glue and wiped clean
before cauling to minimize the mess.
Mitchell used a padded two-caul
system to allow for some soft compression to keep the original veneer from
cracking from pressure. At each stop,
a board was placed over the cauled area, screwed into the backing. The front
was gently but firmly clamped to
hold the caul over the veneer securely
flat while the glue cured.
Once the veneers were resecured, small bits of missing wood were cut to fit from
our veneer and similar procedures used to secure the new wood.


Shellac burnins were used as one fill for the missing marquetry pieces.
Above we show the two-color shellac burnin for the lighter holly wood banding.


Hard wax is created from mixing hard and soft colored waxes.
Above, samples of two different areas utilizing hard wax fills.
These are also excellent to stop future pests from invading.
Below, a corner from start to finish.


Both burnins and hard wax fills were utilized on both
the drawer fronts and carcass sides, as shown above.


The Louis XIV Chest is completed.
Written by Kate Powell, ©MPF Conservation.
May be printed for your own use ONLY, not for use on blogs without permission.


T")


