

Our White Patriotic Jumper had repairs to be made on the tail,
the tail-to-leg connection, all four legs, and his belly.
When these repairs were completed, we could treat surface repairs and finish.
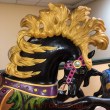
The White Patriotic Jumper is a sample treatment,
so our client can see the process from start to finish!
We continue our documentation of the tail from
JBC: White Patriotic Jumper Treatment, Tail, Part I.
Please excuse the grainy grey images in the woodworking rooms; the yellowed
lighting creates an odd discoloration and makes Mitchell’s hands look black!
Note that a lot of explanations are under the images themselves!

TAIL TO KNEE

The tail to knee gathered water, which caused dry rot.
It means that at some point in Patriotic Jumper’s history,
he was covered with quite a lot of water, and not dried off. Regularly.
*If there are carousel owners reading this, beware!*
Again, this meant more work than anticipated, and the rot was not detected under the thick paint. The rot had to be removed and the wood replaced for a strong connection.
The two areas to be repaired were the tail tip, the knee itself.
After these were repaired, the tail could be reunited with our horse!
TAIL TIP


The repair took several steps. The first was to remove all the rot, and the rot went surprisingly deep — more than one inch into the tail structure.
It appeared that over time some workers had tried to repair the tip
without looking at the cause of the problem, more common than you’d imagine.
Glues were mixed with putties and the crumbling rot, seen in the first few images above.
We located what is likely the original screw hole, going through the tail into the knee.
It took patience to remove all the rot.


The next step was to insert fresh wood of like species into the rotted area; all the while maintaining a viable structural unit which would be able to withstand the rigors of opposing tension and flex which will be asserted over the next many decades of service.
A mortise was created and a precisely corresponding wooden insert fashioned to set into the mortise. In image two, virgin wood is revealed and iron oxide is discovered, proving that the original tail tip was anchored to the knee through the convenience of a screw.
The mortise floor is planed and chiseled to present vertical to the spline,
images three through six. Hide glue with gap-filling PVA is applied,
and the block is inserted, clamped and allowed to cure, images seven through nine.


The tip itself was diminished and needed augmentation to attach properly.
Before the second block was attached, the attached black was trimmed
to accept the second block, and the block itself was fashioned,
then glued as was protocol in the step above, and left to cure.
After curing, the tip was grossly carved to ease the final carving and fitting.
Adding physical structure to the tail tip in order to satisfy the loss of tip structure allowed us to gain proper purchase in connecting to the knee.
ROMANCE KNEE REPARATION
The knee also had dry rot and structural losses to the surface substrate
which connected to the tail structure.
The rot inside the knee had to be removed and replaced.
A large section of loss which extended into the knee was adjacent to the primary connecting points of the leg’s thigh to knee scarf joint.
The structural integrity of the joint had been undermined with several previous repairs. The integrity of the joint was of utmost concern for us when devising a plan by which we could recreate a reliably strong connection to accept the repaired tail to knee join.
Two sets of repairs were done concurrently to strengthen the knee.


The first was to work with the dry rot within the knee, which was excavated.
A mortise was set into the knee to accept the fresh piece of tulip-poplar.
During the mortise excavation we were able to conclude, with confidence,
that the tail was originally secured by screw to the knee. The discovery of iron oxide deposits well into the depth of the knee matched those we saw in the tail tip, above.
A block was crafted to insert into the mortise, then shaped to historic surfaces.
After the glue cured securing the block within the mortise the piece was shaped to historic levels, insuring a proper foundation by which the tail can be re-secured to the knee.


Small losses from prior repair failures were filled,
including two crafted splines to shim the knee joint and prevent it from flexing, above. Veneer shims of tulip poplar were made to fill loose gaps.
The knee was ready to accept the tail!
Soon to be posted, the final reparation of the
White Patriotic Jumper Treatment, Tail, Part III.
Follow us for updates on the happenings at the stable!
We will continue to take you behind the scenes! Currently we have:
Jantzen Beach Carousel Moving Day!
The Jantzen Beach Stable is Full!
Good Monday Morning!
and many others!
To keep abreast of our post, follow us here or
on Instagram (@mpfconservation) or on Facebook !


Written by Kate Powell ©MPF Conservation.
May be printed for your own use ONLY, not for use on blogs without permission.


T")


Pingback: JBC: White Patriotic Jumper Treatment, Oil Paint 4 | Mpfconservation's Blog
Pingback: JBC: White Patriotic Jumper Treatment, Oil Paint | Mpfconservation's Blog
Pingback: JBC: White Patriotic Jumper Treatment, Gesso | MPF Conservation